backing up a nextcoud instance using rsync, remotely

So, all these years my hosted nextcloud has worked perfectly fine. But, as life goes, the old server reached its end of support, and I needed a new solution.

I fiddled around with several hosters, tried self-hosting at home, but our Vodafone Internet isn’t the most reliable. So I got into the oracle cloud, and using their “always free” tier created a really cheap but powerful ARM Ubuntu server to host my nextcloud.

Now that the comfort of hosting is gone, I needed a new solution for backups. And what I basically did is use the steps from the nextcloud docs. Automated, in a script on my nextcloud server, over VPN per rsync on my home NAS. And I make use of hardlinks and versioned backups.

Find my script here for your convenience: https://github.com/maybeageek/RsyncBackupScript/blob/main/ncbackup.sh

So what I basically did was:

  • Create a VCN in the oracle cloud and setup a site2site VPN to my home
  • create a user on my home Proxmox that only has rights to login via ssh using a keyfile, and access rights to one folder alone, and nothing else.
  • ssh-copy-id the key onto my home machine
  • Setup the script on my nextcloud machine in the oracle cloud to run once a night
  • the script then performs the backup tasks
    • nextlcoud into maintenance mode
    • copy nextcloud folder
    • copy data folder
    • dump database and copy over
    • exit maintance mode

Using rsync and its ability to link to previous backups and only copy over what has changed has some nice benefits:

  • Duration: While the initial backup took over 2 hours, each consecutive run is shorter than 5 minutes.
  • Versioned backups: I have a copy of all three (nc folder, data folder and db dump) that is dated and I could chose to restore at any given point
  • Deduplication of sorts: While it is not really a filesystem dedup, every backup really only takes some headroom for the new links (about 300K) and what’s new.
  • Convenience: Using hardlinks on the fs means I don’t have to care about the backup chain like in a traditional backup using full and then incremental backups. I can delete old backups if I like without destroying the chain, as every file points to the inode on the disk, and the data gets deleted once the last reference to the inode was deleted.
user@pve:/tank/ncbackup/nextcloud# ls -lisa
total 65771
59391 9 drwxr-xr-x 14 ncbackup ncbackup 21 Dec 30 04:00 .
34 1 drwxr-xr-x 3 root root 3 Dec 29 11:30 ..
167275 1 lrwxrwxrwx 1 ncbackup ncbackup 49 Dec 30 04:00 current-data -> /tank/ncbackup/nextcloud/data-2023-12-30-03-00-01
160962 1 lrwxrwxrwx 1 ncbackup ncbackup 54 Dec 30 04:00 current-nextcloud -> /tank/ncbackup/nextcloud/nextcloud-2023-12-30-03-00-01
84610 9 drwxrwx--- 8 ncbackup ncbackup 13 Dec 28 11:49 data-2023-12-29
84387 9 drwxrwx--- 8 ncbackup ncbackup 13 Dec 29 14:25 data-2023-12-29-13-25-40
133899 9 drwxrwx--- 8 ncbackup ncbackup 13 Dec 29 14:29 data-2023-12-29-13-29-25
133947 9 drwxrwx--- 8 ncbackup ncbackup 13 Dec 29 14:30 data-2023-12-29-13-30-37
84463 9 drwxrwx--- 8 ncbackup ncbackup 13 Dec 29 15:43 data-2023-12-29-14-43-14
152463 9 drwxrwx--- 8 ncbackup ncbackup 13 Dec 30 04:00 data-2023-12-30-03-00-01
35843 9 drwxr-xr-x 14 ncbackup ncbackup 32 Dec 27 12:52 nextcloud-2023-12-29
119171 9 drwxr-xr-x 14 ncbackup ncbackup 32 Dec 29 14:25 nextcloud-2023-12-29-13-25-40
84447 9 drwxr-xr-x 14 ncbackup ncbackup 32 Dec 29 14:29 nextcloud-2023-12-29-13-29-25
116822 9 drwxr-xr-x 14 ncbackup ncbackup 32 Dec 29 14:30 nextcloud-2023-12-29-13-30-37
146244 9 drwxr-xr-x 14 ncbackup ncbackup 32 Dec 29 15:43 nextcloud-2023-12-29-14-43-14
156804 9 drwxr-xr-x 14 ncbackup ncbackup 32 Dec 30 04:00 nextcloud-2023-12-30-03-00-01
84462 12953 -rw-r--r-- 1 ncbackup ncbackup 31024065 Dec 29 14:29 nextcloud-sqlbkp_20231229-13-29-32.bak
84631 12949 -rw-r--r-- 1 ncbackup ncbackup 31012268 Dec 29 14:30 nextcloud-sqlbkp_2023-12-29-13-30-44.bak
152462 13409 -rw-r--r-- 1 ncbackup ncbackup 32043065 Dec 29 15:43 nextcloud-sqlbkp_2023-12-29-14-43-33.bak
84446 12941 -rw-r--r-- 1 ncbackup ncbackup 31000102 Dec 29 14:25 nextcloud-sqlbkp_20231229.bak
84636 13409 -rw-r--r-- 1 ncbackup ncbackup 32090235 Dec 30 04:00 nextcloud-sqlbkp_2023-12-30-03-00-10.bak
user@pve:/tank/ncbackup/nextcloud#

voila: automated versioned backups, securely transferred over an encrypted VPN using SSH.

rejuvenation of this blog

Hi everybody,

long time, no see. Life has been tremendously busy since my last post in 2017. Woah, besides working a demanding IT job and being a husband, I also finished a MA degree “on the side”, so this explains it a little.

Once that was finished, my wife and I became parents to a wonderful girl, and life, again, was oh so busy. But I feel now is the time to breath life back into this blog.

See you around?

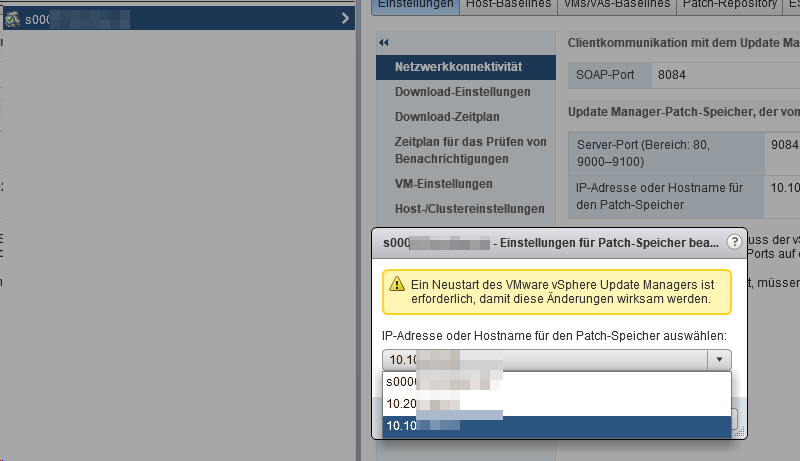
vSphere Update Manager – secondary IP not available in patch store drop down

Hi,

Short story: If the vCenter Server Appliance has two interfaces, you need a DNS entry of the FQDN for both IP addresses, or you wont be able to chose the secondary IP for the Update Manager.

Longer story: If you are anything like me, you want everything separated. Networking for managing the infrastructure (ESXi hosts, switches, storage…) has nothing to do with networking for VMs like Active Directory and Fileservices. Even in a small private cloud like the one from this story.

So, while the vCenter resides on the internal network for AD connectivity, the ESXi hosts are in a separate VLAN. Therefore, the vCenter Server (Windows) has a secondary interface in the management VLAN. Now a new vCenter was installed using the VCSA. And if you want to configure the UpdateManager to use the secondary interface for staging patches to ESXi hosts, you will realize that you can’t chose that interface. Why is that?

Frankly, I don’t know, and I think this shouldn’t be the case. However, I stumbled across the fact that once you make the FQDN resolve both IPs in the separated networks, you are then able to chose the secondary IP, as well.

Happy updating!

Store Manager


ESXi Host loses config after reboot, no remediation/update possible. altbootbank damaged.

Short story: A freshly installed ESXi host lost its config after the first reboot. Curiously, it kept it after a factory reset. However, after a vCenter join no update was possible. Solution down below! 😉

Longer story: It has been quiet here. That is due to multiple factors, one of them being that our vSphere installation is running nice and smoothly.

But now we decided to re-install the hosts with a new image and join them to a new vCenter Server. Both, hosts and vCenter, have been upgraded again and again, and sometimes you just want to start over.

So, I installed the newest HP image, configured the hosts management interface, joined it to the vCenter and configured other things like vMotion network and so on. After a reboot, the host did not reconnect to the vCenter Server. The DCUI stated it had not IP whatsoever, and I couldn’t even give it a new one. No vmkernel NICs showed in the ESX CLI.

After a factory reset everything was there again, so like before I configured everything, joined the server to the vCenter and everything seemed jolly. However, I recognized it wasn’t the newest built, so I tried using update manager to remediate the host.

It wouldn’t even stage the patches, so I went to the console and looked at the /var/log/esxupdate.log file. I sure found the problem:

There was an error checking file system on altbootbank, please see log for detail.’)

Solution: With this error message and google right at hand the solution was easy to find: VMware KB 2033564. It seemed that somehow the bootbank / altbootbank was damaged, for whatever reason I cannot be certain. The important part is: It is fixable, and the host is now up and running with all the latest patches.

vpxd with 100% CPU, vCenter Server unresponsive…

It just so happened that our vCenter Server ran havoc. It is a vCenter 5.5, running on Windows Server 2008 R2, using the bundled MS SQL Express 2008 R2 database.

Symptoms:

  • The .Net AND web client reacted sluggish
  • No connection possible to the Update Manager
  • vpxd service had high CPU, sometimes 100% straight, making the whole server unresponsive.
  • vpxd service sometimes crashed, needing a manual restart.

After a restart, the above cycle would begin roughly after 30 minutes of operations.

When I analyzed the vpxd.log files, I saw many messages regarding the db like so:

Could not allocate space for object XYZ

So I checked the SQL DB and saw that it had only 2 KB of space available. After all, there is a 10GB limit on the 2008 R2 SQL Express.

Searching for a way to purge data, i stumbled across this KB: Purging old data from the database used by vCenter Server (1025914)

It describes similar issues, and helped me to free up about 6 GB of space for the database.

Immediately after starting the procedure mentioned in the link (it took about 40 – 50 minutes to finish) the vpxd service settled and became usable again, solving our problem.

What remains to be figured out is why the Events and Tasks tables had grown so rapidly over the last 90 days that it would jam a 10 GB DB. This environment has only 16 hosts and about 250 VMs.


vSphere 6.5 was just released – PowerCLI on Linux and macOS

Long time no see!

Something happened that I was longing for for years: VMware is really trying for independence from Microsoft Windows.

The new vSphere 6.5 was just announced: blog.vmware

Bringing in its wake several awesome features I will try out in the next couple of weeks:

  • All new HTML5 only Webinterface without the need for plugins.
  • Migration Installation allows you to turn a Windows vCenter Server into a vCenter Server Appliance (Linux)
  • The Update Manager is now fully integrated into the Linux Appliance

PowerCLI on Linux and Mac? PowerCLI Core

This sounds to good to be true:

  • Using all the CMDlets from the Windows Version on Linux and Mac
  • No change needed in any scripts.

There is one small caveat, though: You still need Microsoft Powershell, which is now officially supported for Mac and Linux, too: Powershell for every system

Times are good for Admins using Mac or Linux as Desktop, yeah.

All the best,

maybeageek

Copy only certain subfolders and contents from a folder structure automated, preserving the folder structure.

Hi there,

long time no see. So, we needed to to give some folders and files over to another company. We were supposed to keep the folder structure, but of course we should only copy certain folders, not all. And, of course, these were subfolders inside a list of project folders.

Do it by hand? Well, when you are dealing with 32K of folders and are supposed to copy only some subfolders out of 15K of them that is no fun…

This is the script I cooked up and it does the job just fine, except we ended up using a colleagues script instead of mine 😉

(sorry for the format, it used to look nicer!)

#!/bin/bash
#
# maybeageek
# Version 0.6, 09/July/2014
# UseCase: Copy certain subfolders (one layer depth) and their contents from a source drive,
# ignoring folders that are not written in the files.txt list.
# This will work for one hierarchy of folders/subfolders.
# To have it work with a deeper folder structure, you need to add more for-loops.
#
# Beware though that this will exponentially increase the time this script takes to finish, as it cycles
# through every subfolder checking for every entry in the files.txt.
#
# Attention: Under Windows you need to cd to the destination directory for this to work!
# Otherwise rsync will give you an error.
#
# Also: Even under Windows the files.txt has to be UNIX format, or it won’t work!

LOG=/path/to/log.txt
# a nice formatted output log of this script where you can see what it did for every folder.
FAILED=/path/to/failed.txt
# the full rsync log. This is why we put rsync in -v mode.
SOURCE=/path/to/Source
# your data source.
DEST=/path/to/Destination
# your destination. As this was running under Windows using cygwin, we needed this variable AND
# needed to cd into the destination folder!
FILES=/path/to/list/of/folders.txt
# This file is used to determine which subfolders the script should copy.

for F in $(ls $SOURCE); do
mkdir $DEST/$F;
for S in $(cat $FILES); do
echo \  >> $LOG;
echo “###### Begin ######” >> $LOG;
date >> $LOG;
if test -d $SOURCE/$F/$S;
then
echo “Copy folder:” >> $LOG;
echo $F/$S >> $LOG;
cd $DEST/$F;
rsync -avz –log-file=$FAILED $SOURCE/$F/$S . >> $LOG ;
else
echo “Folder not found:” >> $LOG;
echo $F/$S >> $LOG;
date >> $LOG;
fi
echo “###### End ######” >> $LOG;
done
done

udev and cloning a linux vm: Network not working…

Have you ever stumbled upon a cloned Linux system, in my case CentOS 6.5, where eth0 does not exist and eth1 isn’t started automatically?

When VMware clones a VM it gives its network card a new MAC address, ensuring that you don’t end up with several VMs with the same MAC. If your distro uses udev and it discoveres the new NIC, it gives it a different UUID, thus creating eth1 in the process, since it can’t match the MAC addresses and UUIDs of the NICs. This might break all sorts of scripts or configs.

Here is how to fix it:

  • First we need to remove the discovered and assigned UUIDs from udev:

rm -f /etc/udev/rules.d/70-persistent-net.rules

  • Secondly we need to edit the networking script for eth0:

vi /etc/sysconfig/networking/devices/ifcfg-eth0

Here you should change the old MAC address to the new one the VM got after cloning.

  • Reboot.

Thats it. eth0 should work as it used to on the parent VM.


thanks to William: http://www.envision-systems.com.au/blog/2012/09/21/fix-eth0-network-interface-when-cloning-redhat-centos-or-scientific-virtual-machines-using-oracle-virtualbox-or-vmware/

vSphere 5.5 and ESXi 5.5

Hi all,

today I am not writing because of a certain problem or thing I stumbled upon. The “news” I want to share is somewhat “old” (26 August 2013), too: VMware announced vSphere 5.5 and ESXi 5.5!

Why am I posting this? Besides some cool new features in Hardware Version 10 or on the VDP side and Hypervisor side, a mayor change that will affect how we use vCenter in our Company is: Full Mac OS X Client integration (including the plugin for vCenter WebClient).

Now, if that isn’t great news? 😉

Here’s a short sheet about whats new: http://blogs.vmware.com/vsphere/files/2013/09/vSphere-5.5-Quick-Reference-0.5.pdf

And heres the long story: http://www.vmware.com/files/pdf/vsphere/VMware-vSphere-Platform-Whats-New.pdf

All the best,

maybeageek

HowTo: Use/Migrate an existing local OS X user profile for use with an ActiveDirectory User

So, we’ve all been there: A user is using his Mac with a local account. At some point IT needs to manage all Computers and Passwords, and thus this Mac together with it’s user needs to be ActiveDirectory managed. But of course: No setting, no file, nothing should change, because the user is king (and maybe the company’s boss that hates being upset, and even a changed background or shortcut-location upsets him….). Here’s how to do it:

  • Create a new local user with admin rights.
  • Logout of existing User and into the new admin user.
  • Delete the user you want to migrate. When the system asks, don’t delete or archive the user folder, just leave it where it is.
  • In a terminal issue the following command “sudo mv /Users/oldusername /Users/newusername” where newusername is the shortname of the AD User. This is critical!
  • If not already happened bind the Mac to the AD.
  • Use “chown” in terminal to change the owner of the users directory to the new domain user. Use the shortname, no need to write the FQDN of the AD.
  • Use “directory utility” to change the settings and check the box to create a “mobile account at login”, and check the second box, too.
  • Now logout, maybe reboot. (Sometimes it is needed, sometimes not, depending on how quickly the Mac gets the new AD binding.
  • Login using the new users shortname. It should ask for a mobile profile, create one!
  • You might need to update the keychain password.

Thats it: Enjoy your migrated user folder and settings. You shouldn’t notice any difference besides a new password 😉

One note: The new user is a standard user without administrative rights. If you need to give him/her or the Administrator-Group admin rights, you can to this in the “Directory Utility” as well. Single users won’t work, use groups like this: DOMAINNAME\groupname .

All the best.